ワウ は, あたかも「ワ」「ウ」と発声しているような音色を生成するエフェクトです.
ワウとは?
ワウ
Web Audio APIにおいて, ワウを実装するために必要なのは, BiquadFilterNodeクラスです. そして, BiquadFilterNodeインスタンスを生成するには, AudioContextインスタンスのcreateBiquadFilterメソッドを利用します.
BiquadFilterNodeが定義するフィルタの種類は全部で8つあります. ワウを実装するためには, ローパスフィルタ (Low-Pass Filter) が必要になります.
そして, BiquadFilterNodeインスタンスのtypeプロパティに, 対応する文字列を指定することで利用できます (表2 - 9 - a). ただし, 初期の仕様では, typeプロパティは数値型 (0 - 7) で, それぞれの数値がフィルタの種類に対応していました. したがって, サンプルコード 01のようにフォールバックを記述しておくと安全です.
| Filter Type | String | Number |
|---|---|---|
| ローパスフィルタ | lowpass | 0 |
| ハイパスフィルタ | highpass | 1 |
| バンドパスフィルタ | bandpass | 2 |
| ローシェルビングフィルタ | lowshelf | 3 |
| ハイシェルビングフィルタ | highshelf | 4 |
| ピーキングフィルタ | peaking | 5 |
| ノッチフィルタ | notch | 6 |
| オールパスフィルタ | allpass | 7 |
ワウはエフェクト音のみの出力であるインサート型エフェクトなので, 入力ノードをBiquadFilterNodeに接続し, BiquadFilterNodeをAudioDestinationNodeに接続します.
サンプルコード 01
window.AudioContext = window.AudioContext || window.webkitAudioContext;

// Create the instance of AudioContext
var context = new AudioContext();

// Create the instance of OscillatorNode
var oscillator = context.createOscillator();  // for Input

// for legacy browsers
oscillator.start = oscillator.start || oscillator.noteOn;
oscillator.stop  = oscillator.stop  || oscillator.noteOff;

// Create the instance of BiquadFilterNode
var lowpass = context.createBiquadFilter();

// Set type
lowpass.type = (typeof lowpass.type === 'string') ? 'lowpass' : 0;

// Connect nodes for effect (Wah) sound
// OscillatorNode (Input) -> BiquadFilterNode (Low-Pass Filter) -> AudioDestinationNode (Output)
oscillator.connect(lowpass);
lowpass.connect(context.destination);
もっとも, ローパスフィルタを接続するだけではワウは実現できません. ワウを実現するには, ローパスフィルタのカットオフ周波数を周期的に変化させる必要があります. つまり, 実装としてはAudioParamインスタンスであるBiquadFilterNodeインスタンスのfrequencyプロパティにLFOを接続する必要があります.

図2 - 9 - a. ワウのノード接続
ワウはエフェクト音のみの出力であるインサート型のエフェクトです. また, AudioParamインスタンスであるBiquadFilterNodeインスタンスのfrequencyプロパティにLFOを接続して周期的に変化させる必要があります.
また, 変化の基準となるfrequencyプロパティを低い値に設定すると低音域に対してワウがかかり, 高い値に設定すると高音域に対してワウがかかるようになります. サンプルコード 02では, とりあえず, 中音域 (1000 Hz) に設定しています.
サンプルコード 02
/*
 * Add code to sample code 01
 */

// ....

// Set Base Value
lowpass.frequency.value = 1000;  // 1000Hz +- Depth

// Create the instance of OscillatorNode
var lfo = context.createOscillator();  // for LFO

// for legacy browsers
lfo.start = lfo.start || lfo.noteOn;
lfo.stop  = lfo.stop  || lfo.noteOff;

// for legacy browsers
context.createGain = context.createGain || context.createGainNode;

// Create the instance of GainNode
var depth = context.createGain();  // for LFO

// Connect nodes for LFO that changes frequency periodically
// OscillatorNode (LFO) -> GainNode (Depth) -> frequency (AudioParam)
lfo.connect(depth);
depth.connect(lowpass.frequency);

// Set parameters for LFO
var depthRate = 0.5;  // 50 %

// Set Depth
depth.gain.value = lowpass.value * depthRate;  // 1000 Hz +- 500 (1000 * 0.5) Hz

// Set Rate
lfo.frequency.value = 1;  // 1 Hz
これでワウの実装が完成しました…と言いたいところですが, 残念ながら「ワ」「ウ」と発声しているような音色のエフェクトにはなりません.
ワウを実装するためにもう1つ必要なことが, クオリティファクタ, 特に, ローパスフィルタの場合はレゾナンスと呼ばれるパラメータを大きな値に設定することです.
そして, BiquadFilterNodeインスタンスのQプロパティでレゾナンス (クオリティファクタ) を制御できます.
ちなみに, Qプロパティはフィルタの種類によって制御できる物理量が異なります. ローパスフィルタの場合には, frequencyプロパティ, すなわち, カットオフ周波数におけるゲイン (振幅) を制御します. Qプロパティが大きいほど, カットオフ周波数におけるゲイン (振幅) も大きくなります.
サンプルコード 03
/*
 * Add code to sample code 02
 */

// ....

// Set Quality Factor (Resonance)
lowpass.Q.value = 20;
サンプルコード 03では, Qプロパティを20に設定しています. 経験的に, Web Audio APIにおいては, 10以上を目安にQプロパティを設定するとワウを知覚できるレベルになるかなと思います.
最後に, ワウの実装をまとめます.
サンプルコード 04
window.AudioContext = window.AudioContext || window.webkitAudioContext;

// Create the instance of AudioContext
var context = new AudioContext();

// Create the instance of OscillatorNode
var oscillator = context.createOscillator();  // for Input
var lfo        = context.createOscillator();  // for LFO

// for legacy browsers
oscillator.start = oscillator.start || oscillator.noteOn;
oscillator.stop  = oscillator.stop  || oscillator.noteOff;
lfo.start        = lfo.start        || lfo.noteOn;
lfo.stop         = lfo.stop         || lfo.noteOff;

// for legacy browsers
context.createGain = context.createGain || context.createGainNode;

// Create the instance of GainNode
var depth = context.createGain();  // for LFO

// Create the instance of BiquadFilterNode
var lowpass = context.createBiquadFilter();

// Set parameters for Low-Pass Filter
lowpass.type            = (typeof lowpass.type === 'string') ? 'lowpass' : 0;  // Set type
lowpass.frequency.value = 1000;  // 1000Hz +- Depth
lowpass.Q.value         = 20;    // Set Quality Factor (Resonance)
// lowpass.gain.value      = 0;   // Not used

// Set parameters for LFO

// This value must be less than or equal to 1.0 (100%)
var depthRate = 0.5;  // 50 %

// Set Depth
depth.gain.value = lowpass.frequency.value * depthRate;  // 1000 Hz +- 500 (1000 * 0.5) Hz

// Set Rate
lfo.frequency.value = 1;  // 1 Hz

// Connect nodes for effect (Wah) sound
// OscillatorNode (Input) -> BiquadFilterNode (Low-Pass Filter) -> AudioDestinationNode (Output)
oscillator.connect(lowpass);
lowpass.connect(context.destination);

// Connect nodes for LFO that changes frequency periodically
// OscillatorNode (LFO) -> GainNode (Depth) -> frequency (AudioParam)
lfo.connect(depth);
depth.connect(lowpass.frequency);

// Start sound
oscillator.start(0);

// Effector (Wah) ON
lfo.start(0);
以上でワウが完成しました. さっそく, デモ 26・デモ 27で試してみてください. 基本となるローパスフィルタのカットオフ周波数とレゾナンス, LFOのDepth / Rateを組み合わせてお好みのワウを発見してください.
オートワウ
オートワウも, エフェクトとしてはワウと同じです. しかしながら, ワウのようにLFOによってローパスフィルタのカットオフ周波数 (BiquadFilterNodeインスタンスのfrequencyプロパティ) を周期的に変化させるのではなく, 入力の振幅に連動してローパスフィルタのカットオフ周波数を変化させます.
ギターであればピッキングの強弱 (入力の振幅) に連動して, ワウの音色が変化するので, より細かなニュアンスを表現することが可能なワウとなります.
Web Audio APIにおいて, オートワウを実装するためには以下の実装が必要になります.
- 1. エンベロープジェネレータを実装して, 振幅に変化をつける
- 2. ローパスフィルタのカットオフ周波数を振幅の変化に連動させる
- 3. レゾナンスを大きな値にする
3. に関しては, 前のセクションで実装・解説済です. そして, 1. 2. の実装のためには, AudioParamインスタンスのスケジューリングについて理解している必要があるので, そんなの知らないよ〜という場合は, こちらのページで解説しているので, 簡単にでも理解してみてください.
まずは, エンベロープジェネレータと, オートワウのためのBiquadFilterNodeの接続を実装します.
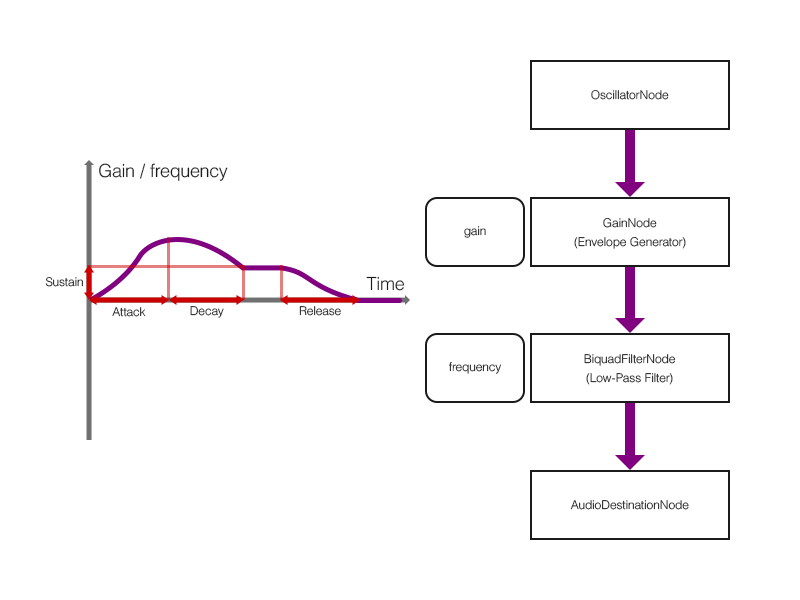
図2 - 9 - b. オートワウのノード接続
オートワウもインサート型のエフェクトです. また, LFOによってBiquadFilterNodeインスタンスのfrequencyプロパティを変化させるのではなく, エンベロープジェネレータに連動させて変化させることに着目してください.
サンプルコード 05
window.AudioContext = window.AudioContext || window.webkitAudioContext;

// Create the instance of AudioContext
var context = new AudioContext();

// for the instance of OscillatorNode
var oscillator = null;

// for legacy browsers
context.createGain = context.createGain || context.createGainNode;

// Create the instance of GainNode (for Envelope Generator)
var eg = context.createGain();

// for legacy browsers
eg.gain.setTargetAtTime = eg.gain.setTargetAtTime ||
                          eg.gain.setTargetValueAtTime;

// Create the instance of BiquadFilterNode
var lowpass = context.createBiquadFilter();

// Set parameters for Low-Pass Filter
lowpass.type         = (typeof lowpass.type === 'string') ? 'lowpass' : 0;  // Set type
lowpass.Q.value      = 20;    // Set Quality Factor (Resonance)
// lowpass.gain.value = 0;   // Not used

// Flag for starting or stopping sound
var isStop = true;

// for detecting sound stop
var intervalid = null;

var attack  = 0.5;
var decay   = 0.3;
var sustain = 1.0;
var release = 1.0;

document.body.addEventListener('mousedown', function() {
    if (!isStop) {
        oscillator.stop(0);
    }

    // Create the instance of OscillatorNode
    oscillator = context.createOscillator();

    // for legacy browsers
    oscillator.start = oscillator.start || oscillator.noteOn;
    oscillator.stop  = oscillator.stop  || oscillator.noteOff;

    // OscillatorNode (Input) -> GainNode (Envelope Generator) -> BiquadFilterNode (Low-Pass Filter) -> AudioDestinationNode (Output)
    oscillator.connect(eg);
    eg.connect(lowpass);
    lowpass.connect(context.destination);

    var t0 = context.currentTime;

    // Start sound at t0
    oscillator.start(t0);

    // Start from gain = 0
    eg.gain.setValueAtTime(0, t0);

    // (at start) + (attack time)
    var t1      = t0 + attack;
    var t2      = decay;
    var t2Value = sustain;

    // Attack : gain increases linearly until assigned time (t1)
    eg.gain.linearRampToValueAtTime(1, t1);

    // Decay -> Sustain :
    //    gain gradually decreases to value of sustain
    //        during decay time (t2) from assigned time (t1)
    eg.gain.setTargetAtTime(t2Value, t1, t2);

    isStop = false;
}, false);

document.body.addEventListener('mouseup', function() {
    if (isStop) {
        return;
    }

    // oscillator.stop(0);  // Unnecessary !!

    var t3 = context.currentTime;
    var t4 = release;

    // in the case of mouseup on the way of Attack or Decay
    eg.gain.cancelScheduledValues(t3);
    eg.gain.setValueAtTime(eg.gain.value, t3);

    // Release :
    //    gain gradually decreases to 0
    //        during release time (t4) from assigned time (t3)
    eg.gain.setTargetAtTime(0, t3, t4);  // Release

    intervalid = window.setInterval(function() {
        var VALUE_OF_STOP = 1e-3;

        if (eg.gain.value < VALUE_OF_STOP) {
            // Stop sound
            oscillator.stop(0);

            window.clearInterval(intervalid);
            intervalid = null;

            isStop = true;
        }
    }, 0);
}, false);
あとは, サンプルコード 05に, ローパスフィルタのカットオフ周波数, つまり, AudioParamインスタンスであるBiquadFilterNodeインスタンスのfrequencyプロパティのスケジューリングを実装するだけです. もっとも, 特別なことはなく, スケジューリングはエンベロープジェネレータに連動させるだけです.
ただし, そのスケジューリングにおける, freqencyプロパティの最大値と最小値は決定しておく必要があります. すなわち, アタック経過時点のfrequencyプロパティとリリース後のfrequencyプロパティです.
とりあえず, サンプルコード 06では, 最大値を4000 Hzに, 最小値をその10 %となる400 Hzに設定しています.
サンプルコード 06
window.AudioContext = window.AudioContext || window.webkitAudioContext;

// Create the instance of AudioContext
var context = new AudioContext();

// for the instance of OscillatorNode
var oscillator = null;

// for legacy browsers
context.createGain = context.createGain || context.createGainNode;

// Create the instance of GainNode (for Envelope Generator)
var eg = context.createGain();

// for legacy browsers
eg.gain.setTargetAtTime = eg.gain.setTargetAtTime ||
                          eg.gain.setTargetValueAtTime;

// Create the instance of BiquadFilterNode
var lowpass = context.createBiquadFilter();

// Set parameters for Low-Pass Filter
lowpass.type         = (typeof lowpass.type === 'string') ? 'lowpass' : 0;  // Set type
lowpass.Q.value      = 20;  // Set Quality Factor (Resonance)
// lowpass.gain.value = 0;   // Not used

// for scheduling frequency
var maxCutoff = 4000;             // 4000 Hz
var minCutoff = maxCutoff * 0.1;  //  400 Hz

// Flag for starting or stopping sound
var isStop = true;

// for detecting sound stop
var intervalid = null;

var attack  = 0.5;
var decay   = 0.3;
var sustain = 1.0;
var release = 1.0;

document.body.addEventListener('mousedown', function() {
    if (!isStop) {
        oscillator.stop(0);
    }

    // Create the instance of OscillatorNode
    oscillator = context.createOscillator();

    // for legacy browsers
    oscillator.start = oscillator.start || oscillator.noteOn;
    oscillator.stop  = oscillator.stop  || oscillator.noteOff;

    // OscillatorNode (Input) -> GainNode (Envelope Generator) -> BiquadFilterNode (Low-Pass Filter) -> AudioDestinationNode (Output)
    oscillator.connect(eg);
    eg.connect(lowpass);
    lowpass.connect(context.destination);

    var t0 = context.currentTime;

    // Start sound at t0
    oscillator.start(t0);

    // Start from gain = 0
    eg.gain.setValueAtTime(0, t0);

    // Start frequency from 400 Hz
    lowpass.frequency.setValueAtTime(minCutoff, t0);

    // (at start) + (attack time)
    var t1      = t0 + attack;
    var t2      = decay;
    var t2Value = sustain;

    // Attack : gain increases linearly until assigned time (t1)
    eg.gain.linearRampToValueAtTime(1, t1);

    // Attack : frequency increases linearly until assigned time (t1)
    lowpass.frequency.linearRampToValueAtTime(maxCutoff, t1);

    // Decay -> Sustain :
    //    gain gradually decreases to value of sustain
    //        during decay time (t2) from assigned time (t1)
    eg.gain.setTargetAtTime(t2Value, t1, t2);

    // Decay -> Sustain :
    //    freqnency gradually decreases to value of sustain
    //        during decay time (t2) from assigned time (t1)
    lowpass.frequency.setTargetAtTime((maxCutoff * sustain), t1, t2);

    isStop = false;
}, false);

document.body.addEventListener('mouseup', function() {
    if (isStop) {
        return;
    }

    // oscillator.stop(0);  // Unnecessary !!

    var t3 = context.currentTime;
    var t4 = release;

    // in the case of mouseup on the way of Attack or Decay
    eg.gain.cancelScheduledValues(t3);
    eg.gain.setValueAtTime(eg.gain.value, t3);

    // in the case of mouseup on the way of Attack or Decay
    lowpass.frequency.cancelScheduledValues(t3);
    lowpass.frequency.setValueAtTime(lowpass.frequency.value, t3);

    // Release :
    //    gain gradually decreases to 0
    //        during release time (t4) from assigned time (t3)
    eg.gain.setTargetAtTime(0, t3, t4);  // Release

    // Release :
    //    frequency gradually decreases to 400 Hz
    //        during release time (t4) from assigned time (t3)
    lowpass.frequency.setTargetAtTime(minCutoff, t3, t4);

    intervalid = window.setInterval(function() {
        var VALUE_OF_STOP = 1e-3;

        if (eg.gain.value < VALUE_OF_STOP) {
            // Stop sound
            oscillator.stop(0);

            window.clearInterval(intervalid);
            intervalid = null;

            isStop = true;
        }
    }, 0);
}, false);
以上でオートワウが完成しました. デモ 28で試してみてください. ベースとなるエンベロープジェネレータの4つのパラメータ, ローパスフィルタのカットオフ周波数とレゾナンス, また, frequencyプロパティの変化の範囲を組み合わせてお好みのオートワウを発見してください.
ワウの原理
このセクションでは, ワウの原理を解説します. とりあえず, 実装ができればOKという場合はスルーしてください.
ワウの原理は, ローパスフィルタに集約されています. したがって, ローパスフィルタについて簡単に解説します.
ローパスフィルタ (低域通過フィルタ : Low-Pass Filter) の機能はその名称が表すように, 低域の周波数成分は通過させ, 高域の周波数成分を遮断します. そして, ローパスフィルタの周波数特性を決定づけるパラメータは2つです. カットオフ周波数とクオリティファクタ (レゾナンス) です. BiquadFilterNodeインスタンスにおいて, frequencyプロパティとQプロパティとして制御可能です.
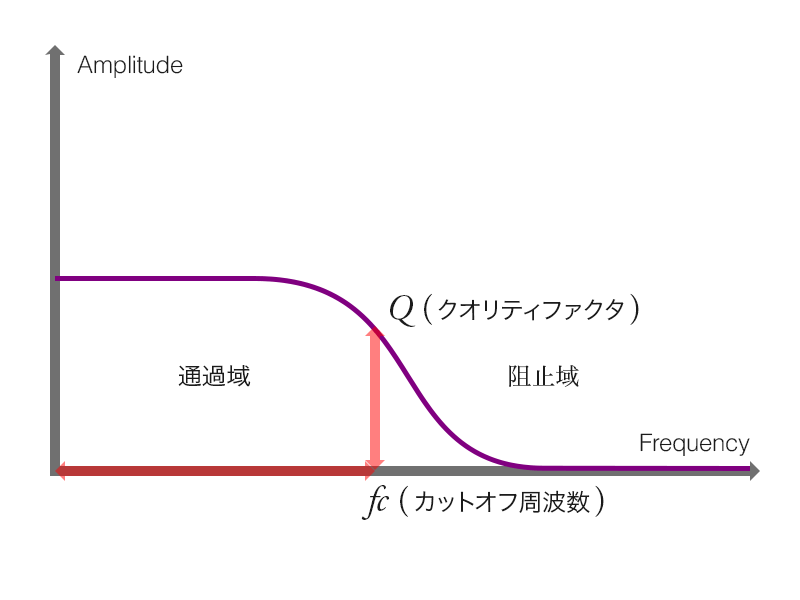
図2 - 9 - c. ローパスフィルタの周波数特性
ローパスフィルタの形状 (周波数特性) です. カットオフ周波数を基準に低域の周波数は通過させ, 高域の周波数は遮断します.
ワウの実装においては, ローパスフィルタのレゾナンス (クオリティファクタ) を大きな値に設定する必要がありました. レゾナンス (クオリティファクタ), つまり, BiquadFilterNodeインスタンスのQプロパティを大きな値に設定すると, ローパスフィルタの周波数特性は図2 - 9 - dのようになります.
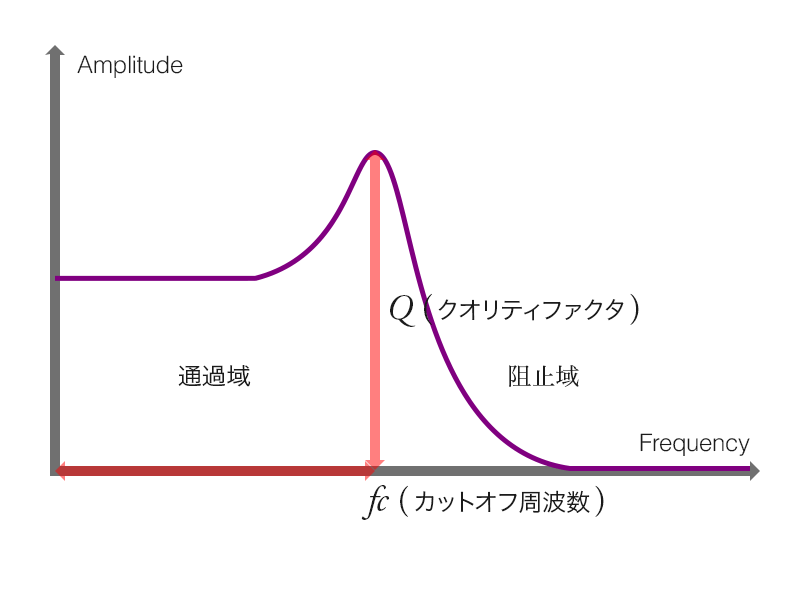
図2 - 9 - d. レゾナンスが大きいローパスフィルタの周波数特性
レゾナンスが大きい場合のローパスフィルタの形状 (周波数特性) です. カットオフ周波数における振幅が急激に大きくなっていることに着目してください.
この形状のローパスフィルタのカットオフ周波数をLFOやエンベロープジェネレータで変化させることによって, 「ワ」「ウ」と発声しているような音色を生成することができます.
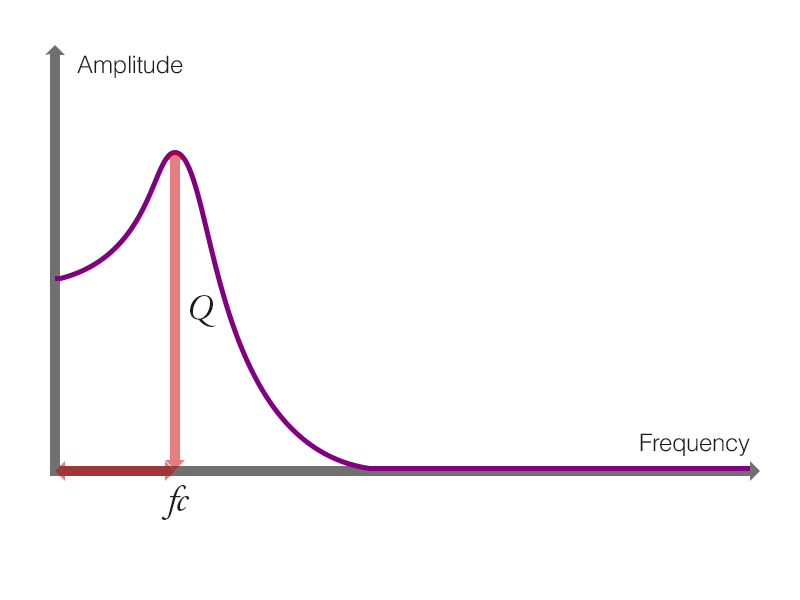
図2 - 9 - e. ワウの原理
ローパスフィルタのピークが周期的に変化することがワウの原理とも表現できます.
ワウ まとめ
このページではワウの実装と原理を解説しました. そのエッセンスをまとめておきます.
| Effector | Connection |
|---|---|
| ワウ |
|
| オートワウ |
|
また, ワウの原理はローパスフィルタに集約されています.
- ローパスフィルタ (低域通過フィルタ : Low-Pass Filter)
-
- 低域の (Low) 周波数成分を通過 (Pass) させる
- frequencyプロパティは遮断周波数 (カットオフ周波数) となる
- Qプロパティは遮断周波数における増幅率 (ゲイン) となる